I am really pleased to announce that I have had a very talented web designer working on redesign of this site for several weeks now. The new design is result of simplification and making this site more robust and easy to use.
I believe in a site without unnecessary annoyance or clutter. I think what we will reveal tomorrow is going to be really beautiful.
There will be a lot of new content to come in the following weeks, so stay tuned.
https://i0.wp.com/www.creativewithjaakko.com/wp-content/uploads/2021/09/E_pxMIQUcAEDkhM.jpg?fit=958%2C549&ssl=1549958crwjaakkohttps://www.creativewithjaakko.com/wp-content/uploads/2021/10/logo.svgcrwjaakko2021-09-30 14:17:192021-09-30 14:22:07New site design going live soon
William Vaughan, the man behind Tofu the Vegan Zombie announced that he will be making Houdini videos from now. I first heard about him when I was learning Lightwave3D back in the day, many many years ago. His Lightwave tutorial videos were simply the best out there.
His recent videos “Vaughan in 60seconds” introduce very useful CG tips and tricks.
https://i0.wp.com/www.creativewithjaakko.com/wp-content/uploads/2021/09/Screen-Shot-2021-09-27-at-8.18.19.jpg?fit=3050%2C1400&ssl=114003050crwjaakkohttps://www.creativewithjaakko.com/wp-content/uploads/2021/10/logo.svgcrwjaakko2021-09-26 23:19:492021-10-02 04:07:12Vaughan on Houdini
His work is really unique and fascinating, it is rare to see African art portrayed in CG. He will also take part in upcoming Adobe Substance talk. You can learn more about it here.
https://www.creativewithjaakko.com/wp-content/uploads/2021/10/logo.svg00crwjaakkohttps://www.creativewithjaakko.com/wp-content/uploads/2021/10/logo.svgcrwjaakko2021-09-22 12:47:222021-09-22 12:47:26African CG Art
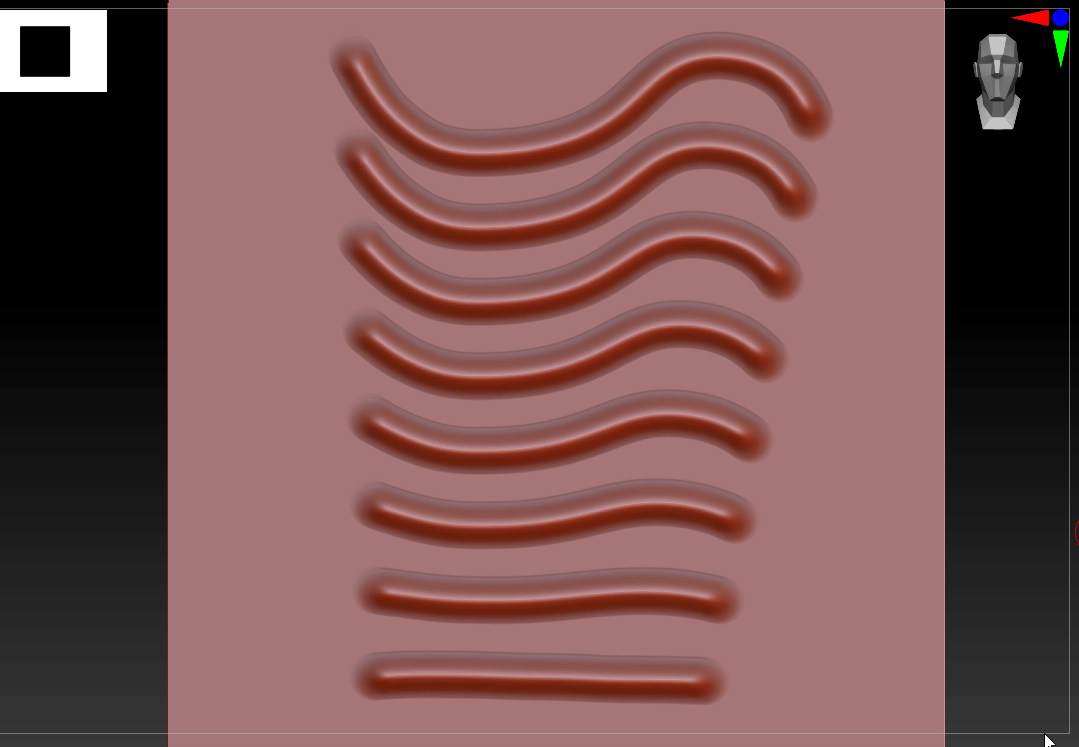
I created this in less than a minute using Stroke Interpolate in ZBrush
The new Stroke Interpolate feature in ZBrush 2021 offers complete new workflows. It is super easy to use, just one click at the Interpolate button found in Stroke palette. It will then, well, interpolate between the two last strokes and you can adjust the number of strokes.
For example the mace style cylinder I created took me less than a minute to create. It is not hard to imagine how this can also be used creatively.
Doodling this kind of patterns for example is super intuitive.
We can also draw a straight line and a curved line and the interpolation with create strokes in between that transform from curved to straight.
Another interesting recipe is to combine radial symmetry with this. It is easy to create repeating organic details such as this.
I this also works with all kinds of brushes. I was able to create this alien pod using clothc brushes with interpolate and symmetry.
Alien pod created with the help of Stroke Interpolate and radial symmetry and cloth brushes.
Experimentation is definitely recommended and you can discover new ways to sculpt as you go. Totally fantastic stuff.
It is still possible to break this by making the two strokes too extreme so its better to avoid making them too extreme
Also there can be no undo between the two strokes as Undo seems to count as a brush stroke which is a bit weird. You need to get both of the strokes right at the first try or else the interpolate doesn’t work. You also can’t rotate the object between strokes which is a bit limiting I should say.
Recently I have had issues with 4.27 loading a project. The engine would crash on start without even giving me an error. The culprit seemed to be SteamVR, disabling that removed the problem.
To stop SteamVR from loading automatically, all you need to do is to disable this from the Editor>Plugins. Uncheck “Enabled” and restart and it should no longer load.
Some users have also been able to stop the plugin from loading by editing this file in Unreal installation.
I think I am among many others who feel SteamVR should not be enabled by default. But then this would mean that HMDs won’t work by default. However as of 4.27 the Editor won’t even load properly with SteamVR enabled so no choice for me at least here.
https://i0.wp.com/www.creativewithjaakko.com/wp-content/uploads/2021/09/steamvr-1.png?fit=459%2C143&ssl=1143459crwjaakkohttps://www.creativewithjaakko.com/wp-content/uploads/2021/10/logo.svgcrwjaakko2021-09-20 23:08:062021-09-20 23:49:03How to stop SteamVR from loading automatically
I have been following the development of this unique painting software called PD Howler (Project Dogwaffle) The new version is full of super unique features and brushes.
I was able to come up with this painting quite quickly using the brushes. One thing that Howler has going for it it’s unique painting features. This won’t be replacing Photoshop anytime soon for photo editing but I love the surprises this has to offer especially what comes to it’s painting capabilities – I just don’t want to end the painting session. I just love this kind of experimental art software. This does all kinds of things, also animation, frame interpolation and upscaling.
I will be writing more about this in very near future including the ray tracing engine (or more accurately a ray caster) Puppy Ray.
MetaHuman created with a face rig, ready to be animated.
MetaHuman Creator was easily one of the biggest things that happened in 2021 so far. It is hard to describe by words how incredibly fast it is to create completely believable humans. And this includes very advanced facial and body rigs. To call this a game changer feels like understatement. Well, this is the result of decades worth of work with companies like 3Lateral and Cubic Motion that are now under the wing of Epic Games.
The way how the process goes as of today is that one signs up for MetaHuman Creator Early Access and then gets to the online site where the design and processing of the characters happen. What this means is that we don’t need super-spec PC to do this as most of the magic happens in the cloud.
Creating MetaHuman is very intuitive and easy that works by blending ready made templates. It seems limiting at first but there is real depth and freedom to this especially when diving to deeper level. There are several hairstyles, beards and so on to choose from. And the template animation that shows the character like posing in front of a mirror is so real it is kind of creepy.
It is amazing how MetaHumans are able to avoid the pitfall of the uncanny valley. Character Creator 3 is a great software but even that has issues with especially the out of the box expressions looking cheap. One needs to really know deeply facial animation and rigging to be able to make good results with that. MetaHuman on the other hand delivers very believable and natural results instantly.
When the character is finished in MetaHuman Creator it is as easy as launching Bridge (What used to be Quixel Bridge) and downloading MetaHuman from there. All of your metahumans appear there as downloadable files.
We need to setup the Bridge plugin from the Export settings. It is also possible to get MetaHumans to work with Maya and we can export as high as 8K texture maps.
MetaHuman with custom clothes I rigged in Maya.
Now what goes on under the hood is really remarkable stuff. What we get are believable shaders, absolutely fantastic hair that is based on grooms that reacts to physics, and full facial and body rig. The facial rig is something we could see in multi-million dollar Hollywood production. It is also pretty easy to use.
Furthermore what’s amazing about this is that we can do high-quality facial animation of MetaHuman characters with with iOS LiveLink. This takes advantage of iPhone ARKit. We can drive facial animation with Live Link Face that is available here. It is quite easy to setup and it is not difficult to imagine the possibilities here.
Rigging custom clothes from Marvelous Designer + ZBrush is relatively straight forward and one can also use the template body that comes with MetaHuman to transfer skin weights to make weighing of the rig faster. The bodies come in several templates and are named logically with a naming convention.
Now, there are limitations of course, one being extremely small amount of garments (the existing garments look good though). Also I feel like the shoulder rig could be better, what comes to body rigs I feel CC3 has more stable rig. In it’s current form – raytracing doesn’t work well with the eyes with simple HDRI for example making the horririble black-eye effect that looks like it is from the Ring franchise. It is easy to somewhat workaround this by lighting the eyes separately or doing a second render pass just for the eyes, but needless to say this is somewhat cumbersome. I suspect that these issues will get fixed in near future so it is not a deal breaker anyhow.
If you are into making characters I definitely recommend to check out MetaHuman Creator. It is free and fun. I will be creating in-depth tutorial on the topic soon.
https://i0.wp.com/www.creativewithjaakko.com/wp-content/uploads/2021/09/metahumanface.jpeg?fit=1702%2C953&ssl=19531702crwjaakkohttps://www.creativewithjaakko.com/wp-content/uploads/2021/10/logo.svgcrwjaakko2021-09-19 01:18:412025-06-27 12:38:12MetaHuman Creator is a Breakthrough
I have been trying to wrap my head around the Autodesk announcement of their new pay-as-you-go model Flex that they just announced. The idea seems to be is that users can pay for the software when needed benefiting infrequent users.
Now I should admit that my first impression of the tweet I saw was, well panic, do I have to swipe my credit card even to open a copy of 3Ds Max, every single day? What about indie licenses?
Well seeing their website, they do have a section that compares Subscription model to Flex stating that Subscription model continues to be best for frequent users. So I guess it is here to stay at least a while.
What I think is good about this is that tokens are universal and can be used to unlock different software. In their site they say that 1000 tokens (Around 3USD per token) are enough for 100 days of Revit, 125 days of Inventor or 166 days of 3ds Max.
Yeah I have to admit this sounds handy. I do need Revit every now and then for occasional file conversion (which is around where my understanding of this particular software ends, as I am not architect), and Inventor as well.
They also say that we can assign as many users as we want for Flex. If I would hire Inventor guy to work in my team I could then give him access to Inventor, and his tokens would then be deducted automatically. This could make sense for small companies.
Although it is unlikely that perpetual licenses return to Autodesk site, I think it is safe to assume that yearly subscriptions will still continue to be a thing. I hope this would also be the case for the indie licenses.
Now we can’t just buy 10 tokens for couple of day’s use of 3ds Max. The lowest option is 500 tokens for 1500 dollars.
This seems to be somewhat comparable cost to the full license of 3ds Max and such. Those eligible, indie licenses continue to be a great value.
Autodesk offers a calculator to estimate the tokens and whether it is recommended versus subscription. In this my test using 3ds Max over 6 days a week jumped the recommended tokens from 500 to 1000, over 7 gave a warning saying its better to just subscribe. Makes sense.
I occasionally come up with materials that are incorrectly setup in Unreal Engine. This often manifests in a way that roughness values seem off, and materials appear too glossy.
When using PBR maps it is necessary to make sure to make them linear space by unchecking sRGB texture settings. This is especially important when using RGB masks such as in the video.
I am showing up a little late to this party, but Nvidia has finally released official version of the Nvidia RTX GI Plugin in the Unreal Engine Marketplace. Well link to external site rather, which leads to Nvidia’s site right here. You will needNVidia account to be able to grab this. But if you are using NVidia card, chances are you already have one.
Click the External Link will take to to the page where you can grab the plugin.
Now, the premise of this is fascinating to say at the least. Unlike Lumen in UE5 this is purely hardware based, so it’s fast. It will require capable hardware as expected, but the results should be similar or even more crisp than what we are able to see with UE5. Finally we will be able to get realistic real time GI, colorful surfaces bleeding light to others, emissive light sources, well being actually emissive and so on. This gives us that sweet baked light look but without baking.
Installation
Let’s take a look how to get up and running with this. So head to the Nvidia’s site here, and grab the plugin. You need to login and click to “Agree to the Terms of the NVIDIA RTX SDKs License Agreement. And you should be able to download the RTXGI_UE4_Binary_Plugin_v1.140.zip.
This will require DXR Capable GPU Windows 10 and such. And Unreal Engine 4.27. Please make sure you have those.
Make sure you have closed Unreal Engine before proceeding. Then go Unzip the archive and copy the complete RTXGI folder to Epic Games\UE_4.27\Engine\Plugins\Runtime\Nvidia.
Now when you open Unreal Engine, you should get popup on the down right about new plugins. Check “Manage Plugins” and make sure the plugin is marked as Enabled. If it is, the plugin should be installed correctly. Before the fun begins, make sure
Now when you open Unreal Engine, you should get popup on the down right about new plugins. Check “Manage Plugins” and make sure the plugin is marked as Enabled. If it is, the plugin should be installed correctly. Before the fun begins, make sure default RHI is set to DirectX 12 and Ray Tracing is enabled. If this is a new project, restart and the sometimes lengthy shader compile is necessary.
Using the Nvidia RTX GI Plugin
Next we need to fire up the console and throw the following commands at it:
r.GlobalIllumination.ExperimentalPlugin 1 to enable global illumination plugins (this can also be set in .ini files, or in blueprints).
r.RTXGI.DDGI 1 to enable RTXGI (set in .ini files, on the console, or in blueprints).
It is good to enable log view from the Window / Developer menu, in this way we can confirm if the GI is really enabled.
Now the engine should be ready for some fantastic RTX GI action. Yay!
Placing DDGIVolume to the scene will work a bit similarly as PostProcessVolume. They contain a grid of probe points that RTXGI will update using Ray Tracing. The DDGIVolume contains related settings that can be adjusted.
Here is what I was able to come up with five minutes of playing with it.
Nvidia RTX GI Plugin in action.
Neat, I say! I placed a spotlight on the middle, shining the light in middle of the purple and white wall. You can see that the bounce now light casts colored light to the right side floor.
At the furthest point you can see emissive cube casting light, and shadows behaving believably way. Also there are no seams. Really, seriously. No seams between modular walls. There used to be a lot of tweaking required when baking modular walls, to get rid of the seams even when the modules were correctly snapped to grid. I welcome this.
If you used a template with static directional light, sun or skylight, and want to change scene to fully dynamic setup it maybe necessary to build lighting to be able to see the new settings in the scene.
It is worth mentioning that currently RTXGI lighting does not work with UE4’s other ray traced effects (for example, ray traced reflections). So Lumen implementation may have edge here although for what I have seen the reflections are not quite there yet either.
We can adjust the probe counts as well as many more useful settings in DDGIVolume. I am planning to return to this topic.
In this example I increased probe count to 13,13,13 and this helped to remove some of the splotching on corners of the room.
With probe counts it is better to keep the count reasonable, otherwise this will cause instant crash but on the other hand too low probe count can lead to splotches or artifacts in the corners.
I will make more in depth tutorial on DDGIVolume settings in near future. At this point I think there must be very few people who know what each of them means. But let’s keep digging!
The new knife brushes in Brush 2021.7 are amazing. No more we get the strange uneven surface when cutting in. This can now be used as a true modeling tool and the resulting cute geometry is also very good and even.
This works especially well when using it in conjunction with dynamesh or retopology.
Quick modeling using knife brushes and Dynamesh in 2021.7
I was able to created this engine piece very quickly by using the knife brushes and booleans.
Quick materials in Substance Painter
Throwing the model to Substance Painter with some fast automatic UVs gave me this piece.
Along with many other features, knife brushes are a must have. It is amazing to have decade worth of free upgrades.